IFTTT is a web service which lets you create Applets. An Applet consists of a trigger and action, an specific action happens if a certain condition (trigger) is met. For example, you can make an Applet which automatically tweets a picture you uploaded on Instagram. In this example, Applet will run when you upload a picture on Instagram (trigger) and action is tweeting that picture on Twitter.

What are IFTTT Webhooks?
If you visit ifttt.com, then you can find Applets offered by various services like Dropbox, Google etc. If you want to use IFTTT platform with your personal project, then Webhooks can be very useful. If your app or script can make or receive a web request, then you can send or receive data from IFTTT and integrate your project with other services offered by IFTTT very easily.
For example: You could create an Applet which sends you an email when door opens. To achieve this, you could use some sensors and Raspberry Pi and when Raspberry Pi detects change in door status, it sends a web request to IFTTT with door status (trigger) and then IFTTT will email you the door status (action).
Example
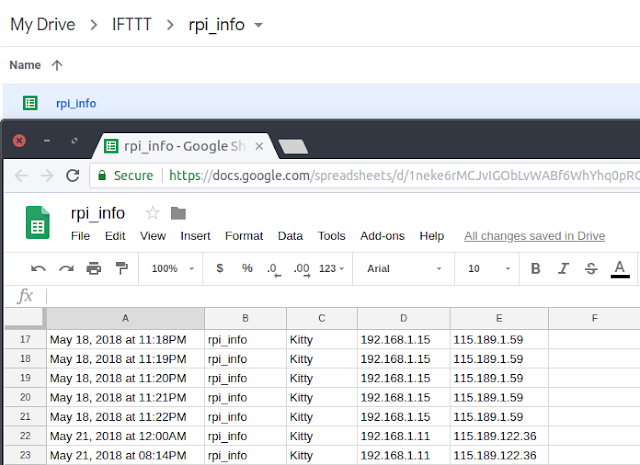
We are going to log network information of Raspberry Pi in a spreadsheet in Google Drive. The information will contain WiFi name, Local IP address and WAN (public) IP address. To achieve this we need to create an Applet, get an key from IFTTT and run a shell script repeatedly so we always have latest network information in Google Drive sheet. When needed, we could easily log into google drive and get the latest IP address assigned to Raspberry Pi.
Getting the Key
Go to the following URL and connect Webhooks with your IFTTT account. You will need to create an account if you haven't already have one. https://ifttt.com/maker_webhooks
Follow the instructions on that page to obtain your key. At the time of writing, this can be done by clicking the Settings or Documentation button on the same page.
Create an Applet
For this example, I used Webhooks as a trigger and save the data received with Webhook request to Google Drive as an action. Here are the steps to do it.
- To create an Applet, visit this link - https://ifttt.com/create/
- Click on this and in step 1, choose Webhooks as a service.
- In next step, click on Receive a web request and enter rpi_info in Event name.
- Now click on that and choose Google Sheets as a service and configure the Sheet row and location of file in Drive.
- Click Finish in last step. Your Applet should look something similar to the following picture when you edit it.

Shell script to make the web request
Go to the home folder of your Raspberry Pi which is /home/pi and create a file called
ifttt.sh and copy and paste the following code in it.
			#!/bin/bash

			ssid=$(iwgetid -r) # Get name of connected WiFi
			ipv4=$(hostname -I | cut -d' ' -f1) # Get LAN IP address of Raspberry Pi
			wan_ip=$(curl -s http://whatismyip.akamai.com/) # Get WAN IP address

			r=$(
				curl
				-X POST
				-H "Content-Type: application/json"
				-d '{"value1": "'$ssid'","value2": "'$ipv4'","value3": "'$wan_ip'"}'
				https://maker.ifttt.com/trigger/rpi_info/with/key/tBsdanRyKr8JWJj9Pl9cFwQEDchS2treHTH-oPqDFL
			)

			log_file=/home/pi/ifttt.log
			date_time=$(date '+%Y-%m-%d %H:%M:%S')
			echo $date_time, $r >> $log_file
Open the terminal in Raspberry Pi and cd to the /home/pi. Give the file execute permissions by running the following command.
chmod +x ifttt.sh
Test the script by running the following command.
./ifttt.sh
You should see a file created in your home directory called ifttt.log with the following log entry if script ran successfully.
2018-05-21 20:14:48, Congratulations! You've fired the rpi_info event.
Running the script repeatedly
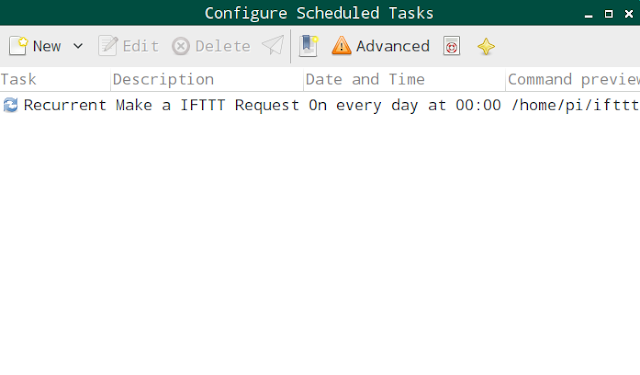
If your WAN IP address or Local IP address changes often, then you can run the script every few minutes or hours. For example: you could schedule the script to run daily at midnight using cron.

If you don't already have the Schedule Tasks program installed on your Raspberry Pi, then you can follow the instructions here to install it.
End Result Achieved!

That's it. Thanks for reading. Please do share if you find this post useful.